Guest post..
Hi, I’m sendmarsh (aka Guy Bowerman) and am pleased to be writing a guest post on Neil’s blog. You can check out my regular blog at MSFT Stack. You can also check out this YouTube video that Neil put together to complement this blog post.
This article takes a look at Azure Cosmos DB, and how to connect using Python and the pymongo library.
What is Cosmos DB and what’s good about it?
Cosmos DB combines a powerful globally distributed, low-latency, scalable database service for NoSQL workloads, and support for multiple data models, APIs and programming languages.
The Cosmos DB engine supports elastic scaling of throughput and storage, with multiple consistency models. In particular, the database engine is extremely good at PACELC – that is, optimizing for the implicit trade-offs between availability, consistency and latency in a partitioned distributed system, delivered as an Azure service with clear SLAs.
This database engine is designed to be inherently extensible, with native support for a range of data models and APIs including SQL, MongoDB, Azure Table storage, Cassandra, and a Graph API for graph traversal and modelling.
The MongoDB API
This article works through a simple example of creating a Cosmos database, and accessing it using Cosmos DB’s MongoDB API.
Though a more complex MongoDB project would require some migration work to get the best use of Cosmos DB distributed and scaling features, the Cosmos DB API is highly compatible with MongoDB. A simple Python program using the pymongo API for example can run against Cosmos DB by simply changing the connection string.
Let’s walk through what it takes to create a Cosmos database..
Environment
Azure Cloud Shell
The Azure resource operations below are illustrated with Bash using the Azure Cloud Shell, a browser-based shell for managing Azure resources which supports both PowerShell and Bash modes, and can be accessed from the Azure Portal, or directly at shell.azure.com. The Bash shell has the latest Azure CLI pre-installed and authenticated.
I also use the Azure Portal which creates CosmosDB connection strings for me, and code with Python 3.x using the PyMongo library.
Step 1. Create an Azure resource group
Azure resources are associated with resource groups, which provide a way to reference and manage resources that have a similar life-cycle. A resource requires a name and location, so let’s create one called mycosmos in the West US 2 region:
# create a resource group
guy@Azure:~/cosmos$ az group create --name mycosmos --location "West US 2"
{
   "id": "/subscriptions/xxxxxxxx-xxxx-xxxx-xxxx-xxxxxxxxxxxx/resourceGroups/mycosmos",
   "location": "westus2",
   "managedBy": null,
   "name": "mycosmos",
   "properties": {
      "provisioningState": "Succeeded"
   },
   "tags": null
}
Step 2: Create a Cosmos database
To create a Cosmos database from the CLI command line, use the az cosmosdb create command. Once the database is created, CLI shows the configuration on the command line:
# create a Cosmos DB
guy@Azure:~/cosmos$ az cosmosdb create --name guysdb --resource-group mycosmos --kind MongoDB

{
   "capabilities": [],
   "consistencyPolicy": {
      "defaultConsistencyLevel": "Session",
      "maxIntervalInSeconds": 5,
      "maxStalenessPrefix": 100
   },
   "databaseAccountOfferType": "Standard",
   "documentEndpoint": "https://guysdb.documents.azure.com:443/",
   "enableAutomaticFailover": false,
   "failoverPolicies": [
   {
      "failoverPriority": 0,
      "id": "guysdb-westus2",
      "locationName": "West US 2"
   }
   ],
   "id": "/subscriptions/xxxxxxxx-xxxx-xxxx-xxxx-xxxxxxxxxxxx/resourceGroups/mycosmos/providers/Microsoft.DocumentDB/databaseAccounts/guysdb",
   "ipRangeFilter": "",
   "isVirtualNetworkFilterEnabled": false,
   "kind": "MongoDB",
   "location": "West US 2",
   "name": "guysdb",
   "provisioningState": "Succeeded",
   "readLocations": [
   {
      "documentEndpoint": "https://guysdb-westus2.documents.azure.com:443/",
      "failoverPriority": 0,
      "id": "guysdb-westus2",
      "locationName": "West US 2",
      "provisioningState": "Succeeded"
   }
   ],
   "resourceGroup": "mycosmos",
   "tags": {},
   "type": "Microsoft.DocumentDB/databaseAccounts",
   "virtualNetworkRules": [],
   "writeLocations": [
   {
      "documentEndpoint": "https://guysdb-westus2.documents.azure.com:443/",
      "failoverPriority": 0,
      "id": "guysdb-westus2",
      "locationName": "West US 2",
      "provisioningState": "Succeeded"
   }
   ]
}
Step 3: Get a CosmosDB connection string
To access the database programmatically, you need a key, which you can then use to create a connection string.
# get the key
az cosmosdb list-keys --name guysdb --resource-group mycosmos --query "primaryMasterKey"

"Z9hLEP1CPcEU8LnSQKYR1uM2JI5fnYIE1vIioWTLUIkico8qdrabPAWCIrHtccSLOUHOPjMcAuE3IcmZvPp1ozDDj=="
Conveniently the Azure portal provides working connection code for your database in a variety of programming languages, so you can copy the Python connection code directly.
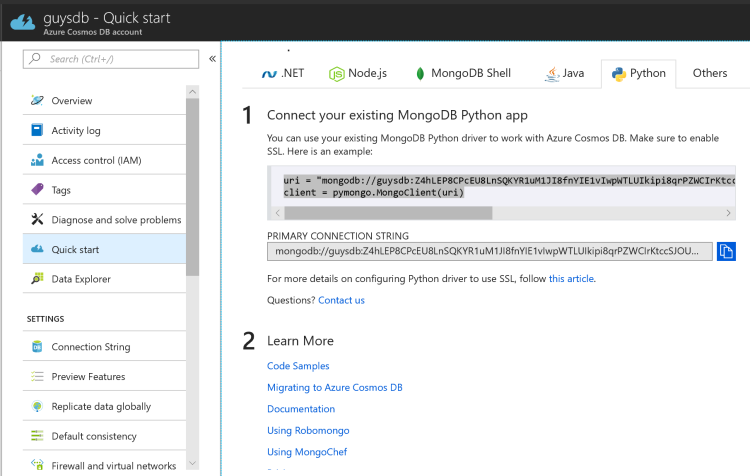
This connection code can then be pasted as-is into a MongoDB client program.
Step 4: Loading, querying and modifying data with Python
In the “hello world” pymongo example below, my minimalist use case is to load a JSON document into a database, and then modify a value in the database.
Since I didn’t have any other JSON documents lying around, and I’ve been playing too much Starbound lately, the first JSON file I thought of was my Starbound server configuration file. The following code loads the file, inserts it into the Cosmos database, selects it from the database, and updates a value in the document. The file location is hard-coded for brevity (i.e. laziness).
In this example, once the configuration file is loaded, it will update a particular value in the document record, the Starbound server name. As it’s short and simple, hopefully it’s easy enough to follow without additional comments..
'''mongotest.py - simple Python program to test a MongoDB endpoint'''
from pymongo import MongoClient
import json
import sys

JSONFILE = '/Program Files (x86)/Steam/steamapps/common/Starbound/storage/starbound.config'

def check_server_status(client):
   '''check the server status of the connected endpoint'''
   db = client.admin
   server_status = db.command('serverStatus')
   print('Database server status:')
   print(json.dumps(server_status, sort_keys=False, indent=2, separators=(',', ': ')))

def main():
   '''Main routine'''
   # connect to MongoDB
   uri = "mongodb://guysdb:Z9hLEP1CPcEU8LnSQKYR1uM2JI5fnYIE1vIioWTLUIkico8qdrabPAWCIrHtccSLOUHOPjMcAuE3IcmZvPp1ozDDj==@guysdb.documents.azure.com:10255/?ssl=true&replicaSet=globaldb"
   client = MongoClient(uri)
   check_server_status(client)

   # create a new database (or connect if it exists)
   db = client.starbound

   # read in a json file
   try:
      with open(JSONFILE) as json_file:
      config_data = json.load(json_file)
   except FileNotFoundError:
      sys.exit('Error opening ' + JSONFILE)

   # insert the doc into Mongo database
   db.starbound.insert(config_data)

   # get a row
   server_name = db.starbound.find({})
   row_id = server_name[0]['_id']
   print('Found row ID', row_id)
   print('Starbound server name: ', server_name[0]['serverName'])

   # update the server name
   db.starbound.update_one({'_id': row_id},{'$set': {'serverName': 'My Starbound server'}}, upsert=False)

   if __name__ == "__main__":
      main()
Conclusions and next steps
I always liked MongoDB and PyMongo for super-easy setup and ease of use, and was pleased to find Cosmos DB equally easy to use. You get a powerful distributed database service that is broadly compatible with MongoDB.
Next steps.. 1. try a more complex migration with a real-world app. There is some guidance available here: Azure Cosmos DB: Import MongoDB data.
2. Dive deeper into Cosmos DB and the other API models it supports. There’s a great technical overview here: A Technical Overview of Cosmos DB.
@Neil thanks for hosting this post! Looking forward to seeing you on MSFT Stack.

1 comment